Shai Greenberg
In this post in the series, we'll focus on a better, proper way of getting the COVID-19 data into Elasticsearch.

15 years ago, I was part of a team that developed an information system for HR departments. We were replacing an old, text-based system with a new and shiny web interface, and thought the customers would appreciate the change. I still remember the meeting where we told representatives of one department the new system did not have a way to process several employees at once, something which the old system did, and they would have to create a work process for each employee. The department manager physically stood on the table at one point of that discussion, but the variety of data required by massive processing made that requirement something we could only deal with down the road.
In this blog series, "down the road" is now. So far we've had to load the COVID-19 data files one by one from Johns Hopkins' CSSE repository. Loading all of them at once won't be as simple as building visualizations (or as photogenic, unfortunately), but don't worry - this post will provide a working solution, deep diving into the parts that concern the Elastic stack and leaving out only a few less relevant details. This solution was tested on files up until 15/4, and while I won't be updating this post to support future changes in the file structure, I'll go into details necessary to maintain the solution as well.
What you'll need other than the setup referred to in the first post is a Bash shell. Bash comes with Linux distributions and OSX, if you're on Windows you can get it as part of the git installation. I won't be going into much detail about Bash or the script in this post, but rather provide it as a download. If you'd rather not use bash, the script has clear comments which will allow you to recreate its functionality in a language of your choice. You may also want to have a good text editor for editing the script - personally I enjoy working with Atom. Additionally, the solution is based on a feature that wasn't available before Elasticsearch 7.6 - I'll briefly address an alternative in case upgrading is not an option.
One does not simply ...
... dive straight into the scripts and Elasticsearch settings. That was fine when the focus of the task was building the visualization and the variety of the data was small. With complex requirements, must come a more detailed design.
As a reminder, we're dealing with a folder that's on a Github repository, containing CSV files with the COVID-19 statistics for each day. Rather than load one of the files, we'd now like to load all of them. Loading a new file as it is created is out of the Elasticsearch focus - for now let's work on the entire repository by using git clone or downloading it as a zip file.
So far we've loaded the files separately and used schemas based on Elasticsearch's inference from the files, while adding some calculated fields. However, as we've seen in the third post, not only is there missing or wrong data, but some files have a different schema than others. Therefore, a process that loads all of the files would have to account for all types of data as well as error handling. In addition, we also want our schema to be backwards- compatible to our existing Kibana index-patterns.
Looking at the files' headers, we can see when and where they were changed. The main change, which occurred on March 22nd, was the addition of FIPS data and the field names change we've seen in the previous post (We'll refer to files before the change as V1, while files after the change will be referred to as V2). We can also see that some of the initial files did not have the latitude and longitude fields. Another thing we may notice is that the "Last Update" field has a different format across some of the files.
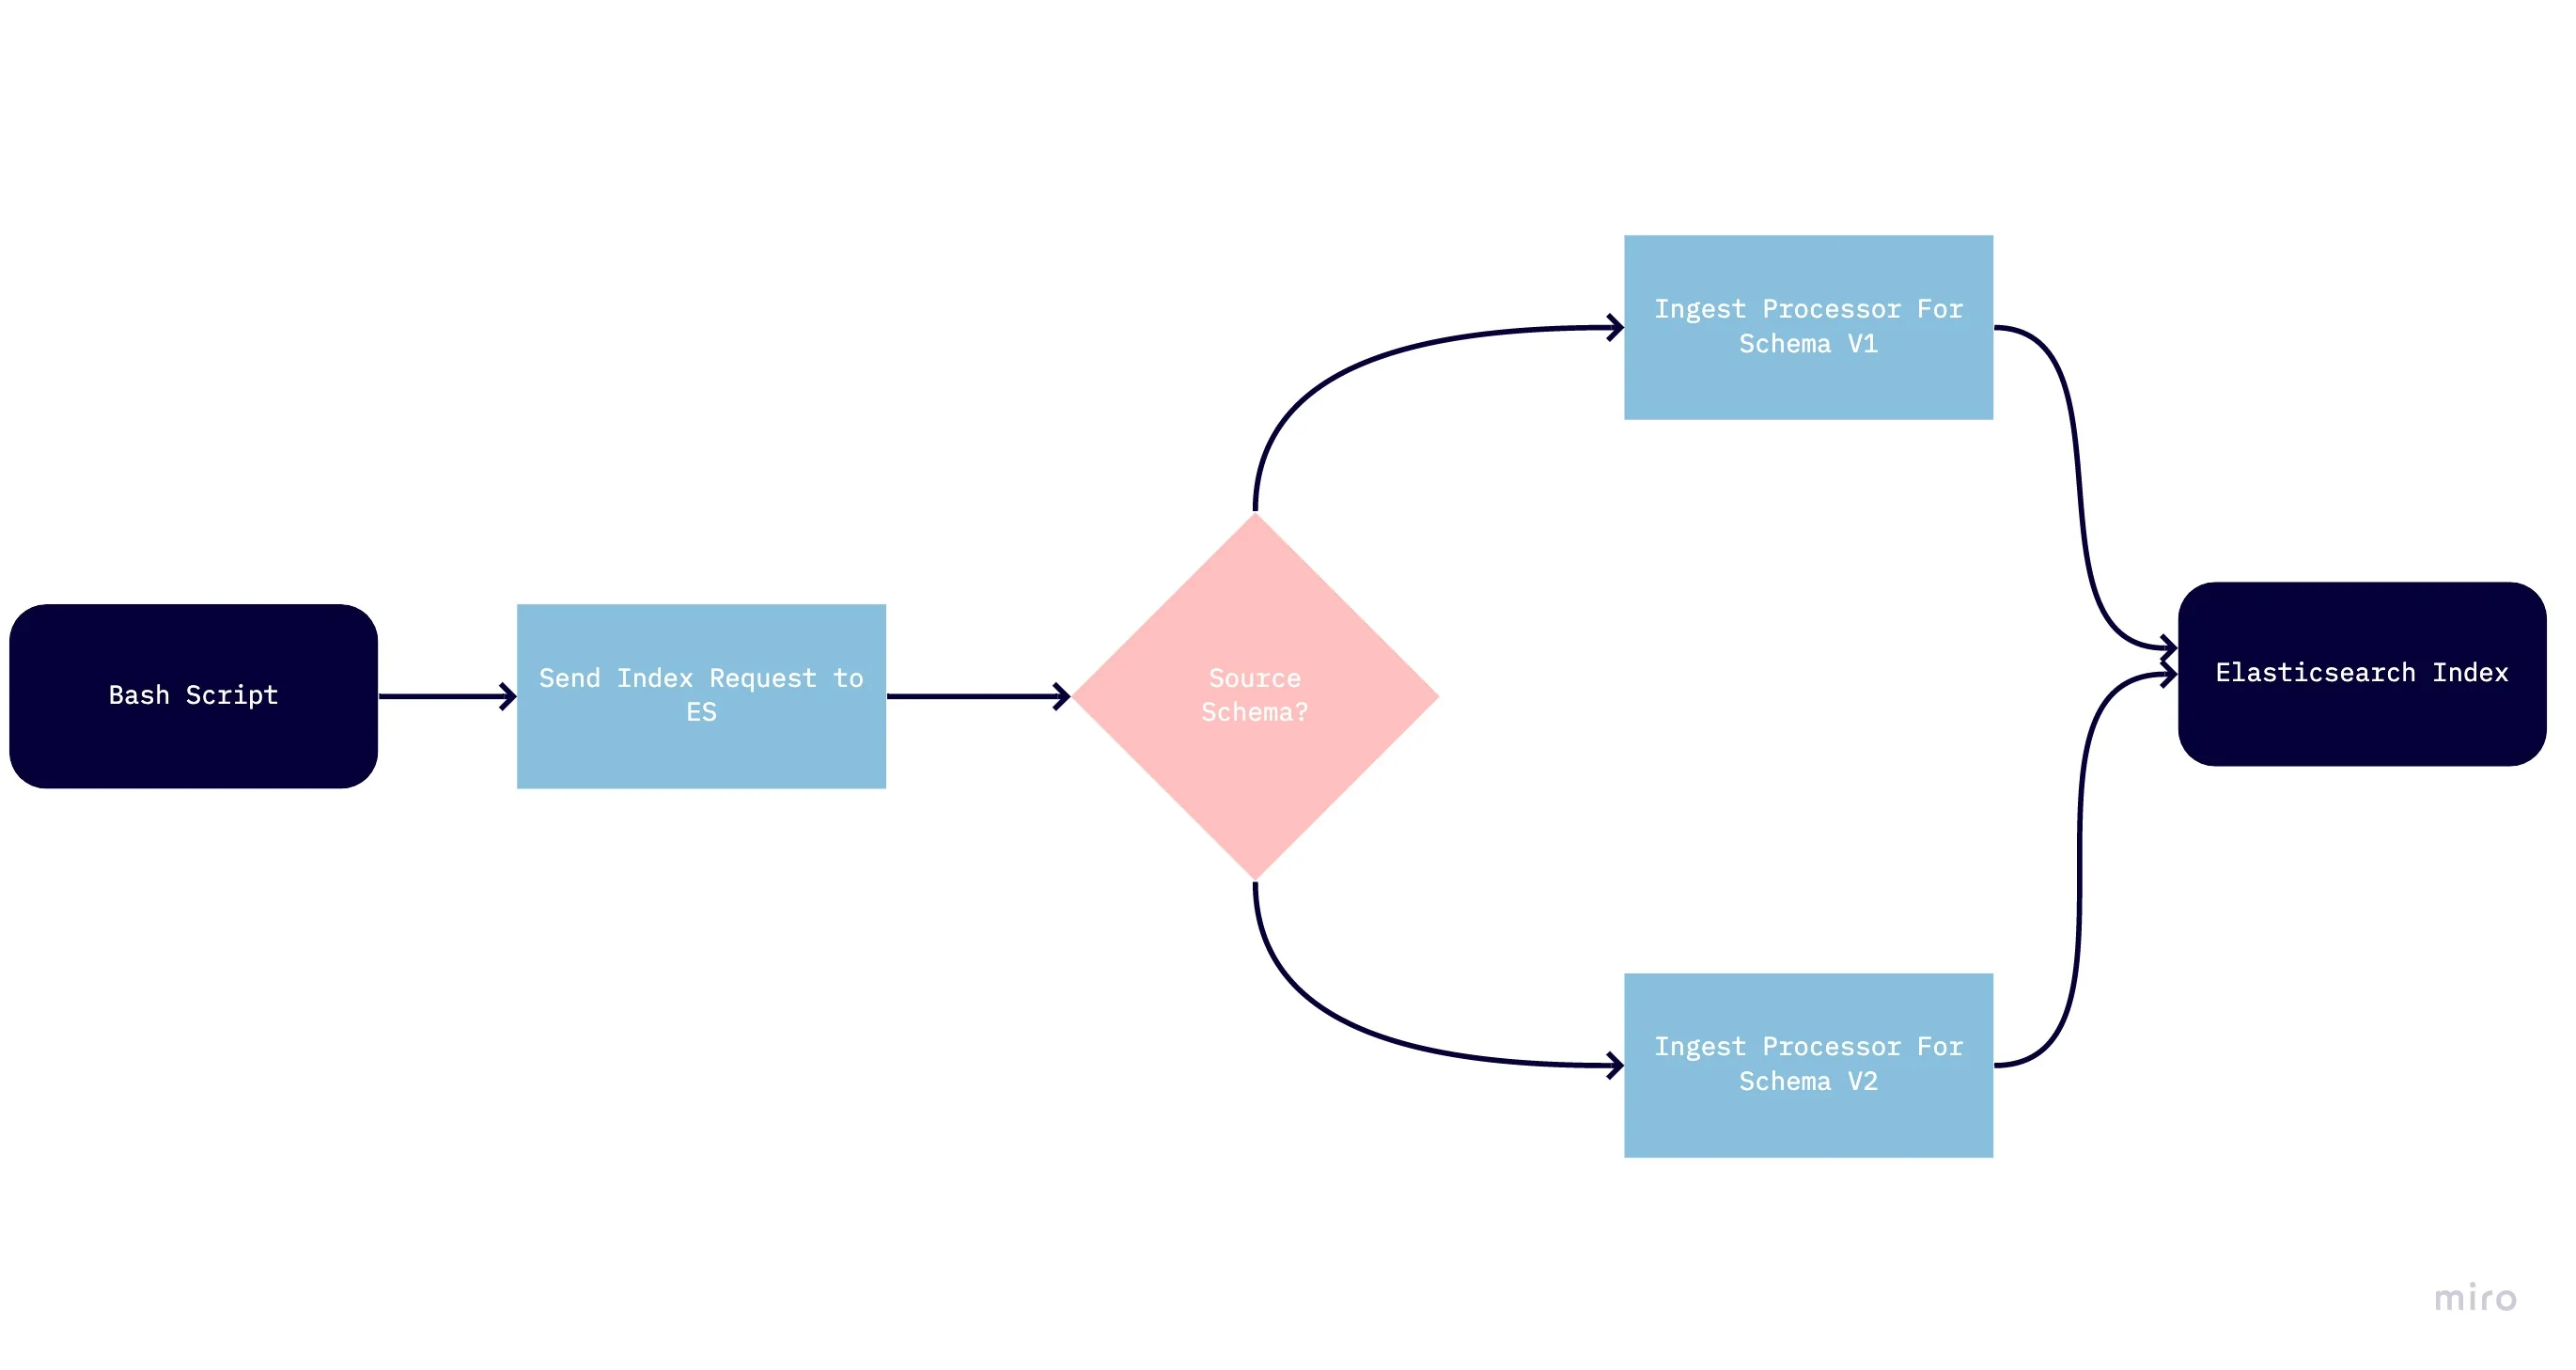
With these points in mind, we can start thinking about the overall architecture. In order to serve the files to Elasticsearch, I've chosen a shell script, which allows processing the data in a way that maintains the context of its name and header. In order to convert the CSV lines to fields and further processing in the Elasticsearch side, we'll use the CSV Ingest Processor, available on Elasticsearch 7.6 pr later (otherwise, you'll have to use Grok to implement that logic).
Additional design decisions involve conforming the different schemas to a single index rather than keeping the sources separate (the size of the data does not justify the use of several indices, and conforming schemas is a common requirement). Finally, I've kept the standard from the previous posts of having the file name as the date field, in order to avoid duplicate data.
The Grand Schema of things
Based on the schemas we've created for the earlier indices, we now define a schema which will serve the new index.
We define the schema as a template, which you can see here. That way we're separating the definition of the schema and the creation of the index, which will happen upon first insertion. Once data is written, the schema for that index is set, however any new index created with the pattern of corona-* will get the schema from the current version of the template, which also means you can always start from scratch assuming you still have the data.
Notice how we're including fields for both versions of the source data and using the "copy_to" parameter to maintain both, as in the previous post. Also, note the "Type" field. This will be the field used to determine which version of the source data this record came from. While this is not necessary from a business perspective once we've loaded the data, it is always a good idea to keep this kind of data around.
Setting the refresh interval to -1 is meant to help insert the documents as fast as possible. The refresh operation takes the documents and indexes them, thus making them searchable. Once the indexing operation is complete, this can be set to "1s" or refreshed once, depending on whether further updates are planned.
We haven't actually written requests in ES syntax so far in this series, but rather created visualizations in Kibana that generate such requests. Kibana also offers the most convenient way to send requests to Elasticsearch, which is the Dev Tools application, found under the wrench icon in the application sidebar. Once there, you can paste the template creation request into the left panel and run it using the "play" icon.

Scriptin' ain't easy
In short, the Bash script loops over the files in the directory, and then loops over each line in the file, transforming it to a form which will be more easily received by Elasticsearch. You can find the script here.
Notice that for mac you'll have to install coreutils (homebrew: brew install coreutils) for the script to work.
The following transformations are performed in the script:
1. Marking which schema version of the source file was used
2. Replacing comma separators with pipes and removing double quotes. This is required in order to be able to send the data to Elasticsearch using the curl command.
3. Conforming "Last Update" values with a space separator between date and time, to a format that has T as a separator instead
4. Adding a timestamp field taken from the date contained in the file name.
The index name chosen is corona-v2-fb, to allow the index to match the previously created index patterns in Kibana.
Don't run the script just yet - we have some more preparation on the Elasticsearch side before that.
A Painless Ingestion Process
You may have noticed the actual command that the script uses to index to Elasticsearch uses the coronacsvs pipeline.
The pipeline runs on a component of Elasticsearch called the Ingest Node, which allows executing transformations on the data before indexing them.
The pipeline uses several processors, which run sequentially.
You can find the complete API call the creates the pipeline here, but we'll go over each part to explain how it works. Once you've examined it and modified it to your needs, paste the call in Kibana and run it.
The first two processors in our example are CSV processors which transform the lines from the CSV file into field values in Elasticsearch. As we have several versions of the files, the appropriate processor is run according to the version determined at the Bash script stage.
{
"csv": {
"field": "Message",
"target_fields": ["@timestamp","Province/State","Country/Region","Date_Input","Confirmed","Deaths","Recovered","Latitude","Longitude"],
"if": "ctx.Type=='V1'",
"separator": "|"
}
},
{
"csv": {
"field": "Message",
"target_fields": ["@timestamp","FIPS","Admin2","Province/State","Country/Region","Date_Input","Latitude","Longitude","Confirmed","Deaths","Recovered","Active","Combined_Key"],
"if": "ctx.Type=='V2'",
"separator": "|"
}
},
The next processor should be familiar from a previous post, it's the creation of the "Location" field that's based on latitude and longitude. Here we also tackle the issue of records with missing data in those fields that we've seen in another post. The reason this transformation is done here and not in the Bash script is because at this point we already have latitude and longitude as separate fields from the CSV processor, so we can leverage that and the ingestion syntax that we've already written.
{
"set": {
"field": "Location",
"value": "{{Latitude}}, {{Longitude}}",
"if": "ctx.containsKey('Latitude') && ctx.containsKey('Longitude')"
}
},
Following that, we have one more processor, this time used to set the value of "Last_Update". Elasticsearch can process dates in ISO8601 format with the Date processor. In the Bash script we've essentially converted some of the values of that field to ISO8601, however others now appear with potentially-single-digit values for date and time fields, which are unfortunately not compatible with the Date processor, with or without the T we've added for ISO8601 compatibility.
Luckily, the Date processor raises an error upon encountering an unfamiliar format. Once it does, we'll change the field format with a Painless script. We've already done some work with Painless in a previous post to create a calculated field in an index pattern. This time, we'll use it for a transformation during ingestion.
{
"date": {
"field": "Date_Input",
"target_field": "Last_update",
"formats": ["ISO8601"],
"on_failure": [
{
"script": {
"source": "ctx.Last_Update = new SimpleDateFormat('MM/dd/yyyy h:m').parse(ctx.Date_Input.replace('T',' '))"
}
}
]
}
}
This script makes the assumption that this is the only issue remaining with that field, but of course that may not be the case in the future.
Working with scripting in Elasticsearch is often not an easy task.
Before using the script in the processor, it is recommended to test it using the execute API:
POST /_scripts/painless/_execute
{
"script": {
"source":
"String datetime = '12/11/2020T11:53'; new SimpleDateFormat('MM/dd/yyyy h:m').parse(datetime.replace('T',' '))"
}
}
Notice the lack of spaces between the lines of code in the "source" field. The value returned by the script is the result of the last line of code.
The script in the processor makes reference to ctx, which is the actual JSON being processed. SimpleDateFormat is a Java class that formats dates. Note that Painless allows using only a subset of Java - you'll have to test any syntax first to see that it works.
Running everything
The Bash script can be run using
chmod u+x coronacsv2es.sh
/coronacsv2es.sh location_of_csv_files > output
Once the script is done running, searching the output file for the word "error" allows us to find issues with the data or the script, such as those created by a schema change.
Once the process has finished running, you can refresh the index by running POST /corona_v2_fb/_refresh/ in Dev Tools, or setting a non-negative refresh interval for the index.
If you decide to change the template, you can start over by deleting the index.
What's next?
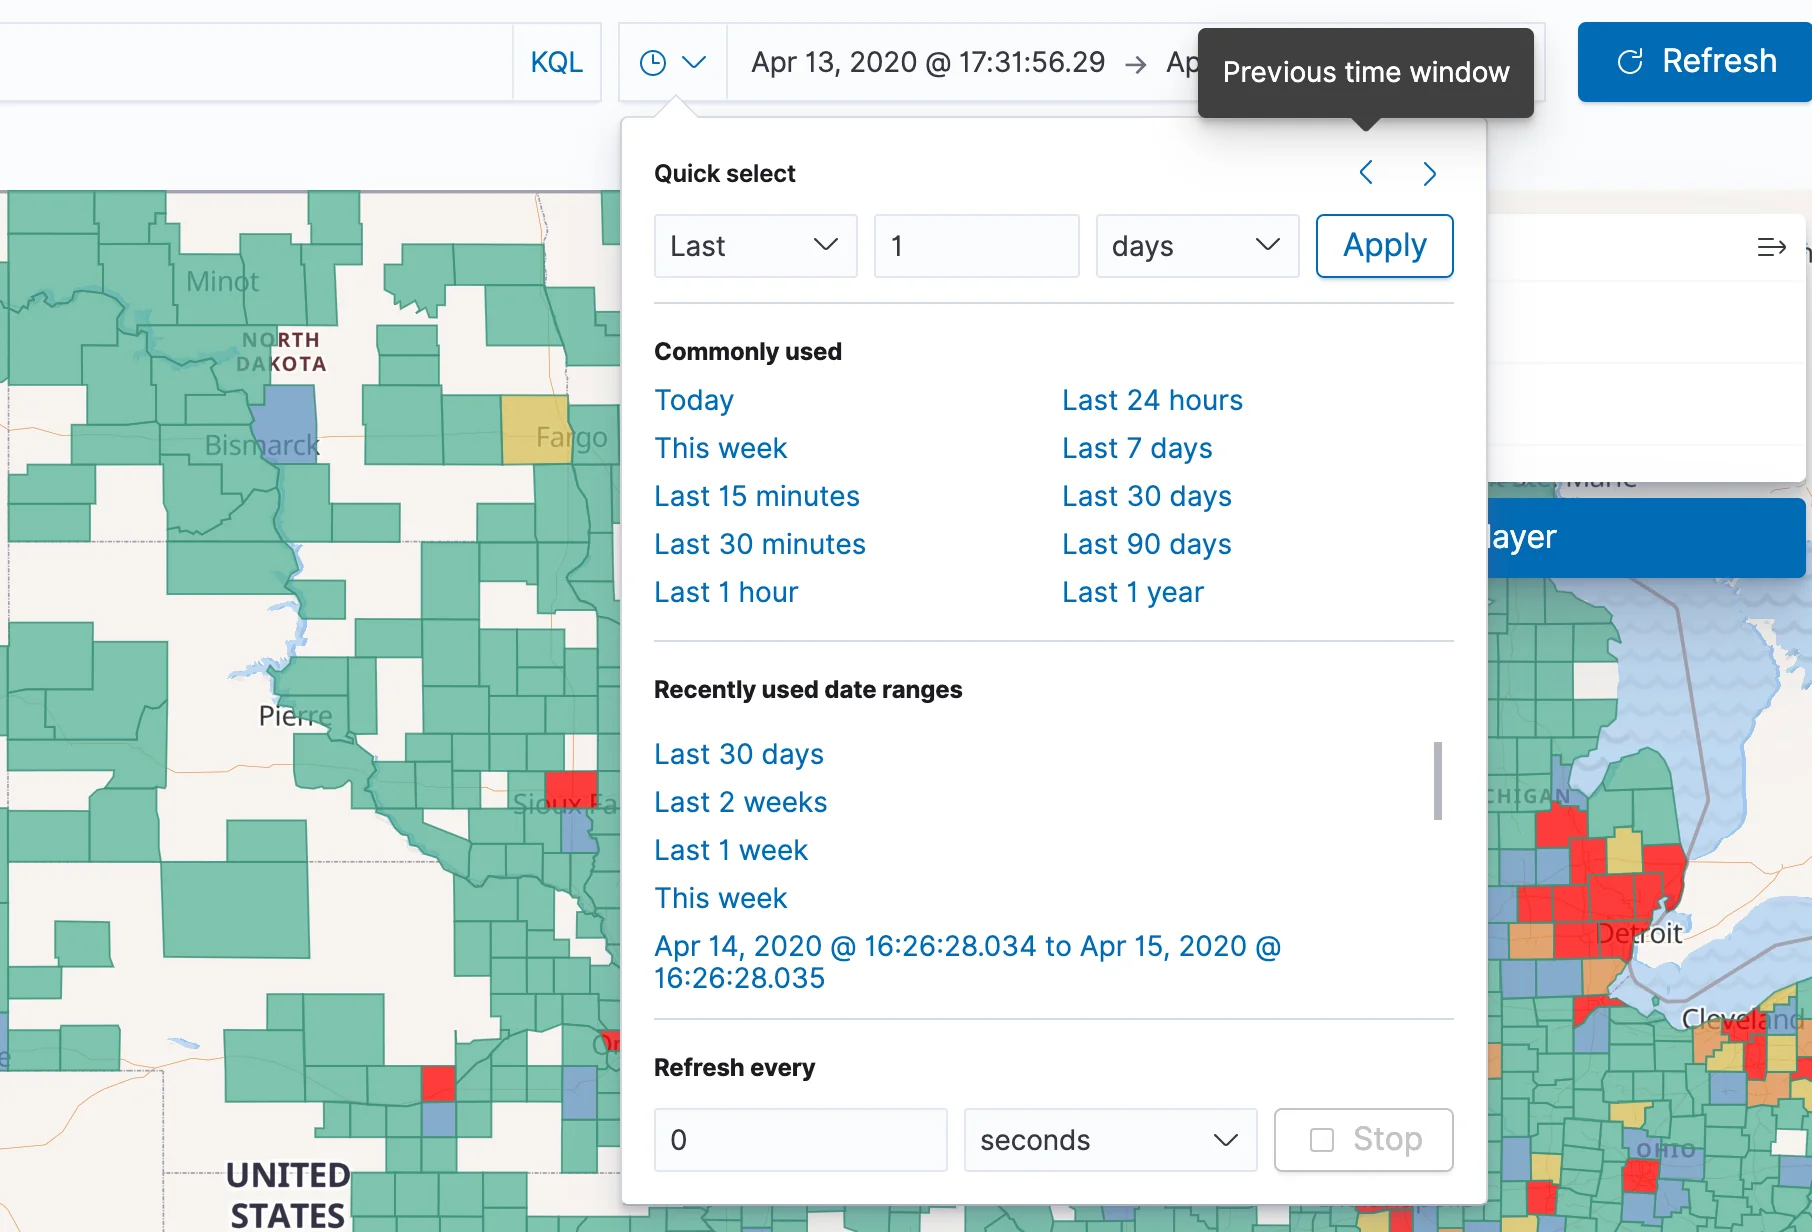
You can now open the visualizations we've created in the previous posts and navigate the data in a time-based fashion, for instance getting a sense of the spread of Corona over the last few weeks across the US. Navigation between periods requires working with the "Quick Select" option found in the clock icon near the time filter. Once you press it, choose "Last 1 day", Apply, and then move backwards and forwards in time using the "previous time window" and "next time window" at the top.
Our team can help your organization make magic happen with Elasticsearch and Kibana. Reach out to us today!